
1. @for
- @for 키워드는 스타일을 반복적으로 출력하는데 사용합니다.
- JS의 for문과 유사합니다.
1) @for문법
## 문법1
// through
// 종료 만큼 반복
@for $변수 from 시작 through 종료 {
  // 반복 내용
}
- 변수는 JS처럼 관례상 $i를 사용합니다.
## 문법2
// to
// 종료 직전까지 반복
@for $변수 from 시작 to 종료 {
  // 반복 내용
}
- 변수는 JS처럼 관례상 $i를 사용합니다.
2) #{ }
- #{ } 를 통해서 코드의 어디든지 변수 값을 넣을 수 있습니다.
## test.scss
$img: unquote("test01.jpg");

h1{ background-image: url(images/#{$img}); }
- 위에서 보고 있는 unquote() 함수는 문자에서 따옴표를 제거합니다.
## test.css
h1 {
  background-image: url(images/test01.jpg);
}
3) @for 예시 - through
- div태그가 가로폭을 50px~250px까지 각각 처리되는 것을 코딩해보겠습니다.
## test.html
<!DOCTYPE html>
<html lang="ko">
    <head>
        <meta charset="UTF-8">
        <title>SASS - 반복문</title>
        <link rel="stylesheet" href="css/test.css">
    </head>
    <body>
        <div>박스1</div>
        <div>박스2</div>
        <div>박스3</div>
        <div>박스4</div>
        <div>박스5</div>
    </body>
</html>
## test.scss
div{
    height: 50px; margin-bottom: 10px;
    background-color: pink;
}
@for $i from 1 through 5 {
    div:nth-child(#{$i}){
        width: 50px * $i
    }
}
## test.css
div {
  height: 50px;
  margin-bottom: 10px;
  background-color: pink;
}
div:nth-child(1) {
  width: 50px;
}
div:nth-child(2) {
  width: 100px;
}
div:nth-child(3) {
  width: 150px;
}
div:nth-child(4) {
  width: 200px;
}
div:nth-child(5) {
  width: 250px;
}
## 브라우저 결과

- 알아서 가로폭이 각각 50px~250px까지 적용되는 것을 확인할 수 있습니다.
4) @for 예시 - to
## test.html
<!DOCTYPE html>
<html lang="ko">
    <head>
        <meta charset="UTF-8">
        <title>SASS - 반복문</title>
        <link rel="stylesheet" href="css/test.css">
    </head>
    <body>
        <div>박스1</div>
        <div>박스2</div>
        <div>박스3</div>
        <div>박스4</div>
        <div>박스5</div>
    </body>
</html>
- 위의 through때와 코드는 같습니다.
## test.scss
div{
    height: 50px; margin-bottom: 10px;
    background-color: pink;
}
@for $i from 1 to 5 {
    div:nth-child(#{$i}){
        width: 50px * $i
    }
}
## test.css
div {
  height: 50px;
  margin-bottom: 10px;
  background-color: pink;
}
div:nth-child(1) {
  width: 50px;
}
div:nth-child(2) {
  width: 100px;
}
div:nth-child(3) {
  width: 150px;
}
div:nth-child(4) {
  width: 200px;
}
## 브라우저 결과

- 마지막 요소에는 들어가지 않습니다. <div> 태그는 block요소여서 width의 기본값이 100%이기 때문에 꽉채워 들어갑니다.
2. Lists와 Maps 데이터
- Lists와 Maps는 데이터를 여러 개 나열해서 담는 것을 의미합니다.
- 자바스크립트를 배운 분들은 Lists는 배열과 Maps는 객체와 비슷하다고 보시면 됩니다.
1) Lists
## 문법
$변수명: 값1, 값2, 값3, ...;
혹은
$변수명: (값1, 값2, 값3, ...);
혹은
$변수명: 값1 값2 값3;
## Lists와 함께 쓰이는 함수
| 함수 | 설명 | 예시 |
| append(리스트,값,분리기호) | 리스트 끝에 단일 값을 추가합니다. 구분 기호는 자동 혹은 쉼표 또는 공백 자동이 기본값 |
$test: a b c; append($test,d); //결과: $test: a b c d; $test: a, b, c; append($test,d,comma); //결과: $test: a, b, c, d; |
| index(리스트,값) | 리스트의 값에 대한 인덱스 위치를 반환 | $test: a, b, c; index($index, b); //결과: 2 //JS와는 다르게 1번부터 인덱스번호 시작 |
| is-bracketed(리스트) | 리스트에 대괄호가 있다면 true를 반환, 없다면 false를 반환 |
$test: ([a, b c]); is-bracketed($test); //true $test: (a, b c); is-bracketed($test); //false |
| join(리스트1,리스트2,구분기호) | 리스트1 끝에 리스트2값을 추가합니다. 구분기호는 자동 혹은 쉼표, 공백 기본값은 자동입니다. |
$test1: a, b, c; $test2: d, e, f; join($test1,$test2); //결과 : a, b, c, d, e, f |
| length(리스트) | 리스트의 개수를 반환 | $test: a, b, c; length($test); //결과: 3 |
| list-separator(리스트) | 리스트를 구분하고 있는 기호를 반환 | $test: a, b, c; list-separator($test); //결과: "comma" $test: a b c; list-separator($test); //결과: "space" |
| nth(리스트,인덱스번호) | 리스트 중 인덱스번호에 해당하는 값을 반환 | $test: a, b, c; nth($test,2); //결과: b |
| set-nth(리스트,인덱스번호,값) | 리스트 중 인덱스번호 값을 지정된 값으로 변경 | $test: a, b, c; set-nth($test,2,x); //결과: a, x, c |
| zip(리스트들) | 리스트를 단일 다차원목록으로 결합 | zip(1px 2px 3px, solid dashed dotted, red green blue); //결과: 1px solid red, 2px dashed green, 3px dotted blue |
## test.html
<!DOCTYPE html>
<html lang="ko">
    <head>
        <meta charset="UTF-8">
        <title>SASS - 반복문</title>
        <link rel="stylesheet" href="css/test.css">
    </head>
    <body>
        <h1>제목태그</h1>
        <h1>제목태그</h1>
        <h1>제목태그</h1>
    </body>
</html>
## test.scss
$color: red, green, blue;

h1:nth-child(1){ color: nth($color,1); }
h1:nth-child(2){ color: nth($color,2); }
h1:nth-child(3){ color: nth($color,3); }
- nth() 함수로 색상들을 각각 선택해봤습니다.
- 이걸 반복문과 쓰면 편리하겠죠?
## test.css
h1:nth-child(1) {
  color: red;
}
h1:nth-child(2) {
  color: green;
}
h1:nth-child(3) {
  color: blue;
}
## 브라우저 결과
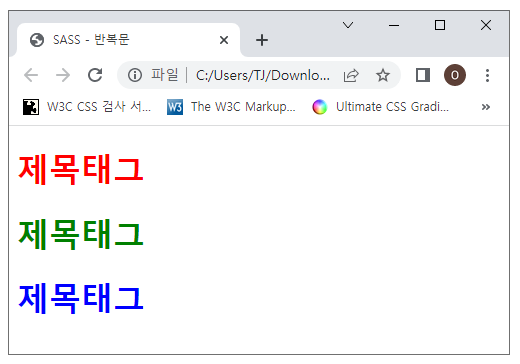
- 각각의 색으로 잘 나오는 것이 보입니다.
2) Maps
## 문법
$변수명: ("키명": 값, "키명": 값, "키명": 값);- Lists와는 다르게 괄호()를 항상 작성해야 합니다.
## Maps와 함께 쓰이는 함수
| 함수명 | 설명 | 예시 |
| map-get(맵,키명) | 맵에서 지정된 키의 값을 반환 | $size: ("s": 12px, "m": 18px, "l": 24px); map-get($size, "s"); //결과: 12px |
| map-has-key(맵,키명) | 맵에서 지정된 키가 있는지 확인하여 있으면 true를 반환, 없으면 false를 반환 | $size: ("s": 12px, "m": 18px, "l": 24px); map-has-get($size, "big"); //결과: false |
| map-key(맵) | 맵목록의 모든 키를 반환 | $size: ("s": 12px, "m": 18px, "l": 24px); map-key($size); //결과: "s", "m", "l" |
| map-merge(맵1,맵2) | 맵1의 끝에 맵2를 추가 | $size1: ("s": 12px, "m": 18px, "l": 24px); $size2: ("xl": 30px, "xxl": 36px); map-merge($size1, $size2); //결과: "s": 12px, "m": 18px, "l": 24px, "xl": 30px, "xxl": 36px |
| map-remove(맵, 키명..) | 맵에서 지정된 키를 제거 | $size: ("s": 12px, "m": 18px, "l": 24px); map-remove($size,"s"); //결과: "m": 18px, "l": 24px |
| map-values(맵) | 맵의 모든 값 목록을 반환 | $size: ("s": 12px, "m": 18px, "l": 24px); map-values($size); //결과: 12px, 18px, 24px |
## test.html
<!DOCTYPE html>
<html lang="ko">
    <head>
        <meta charset="UTF-8">
        <title>SASS - 반복문</title>
        <link rel="stylesheet" href="css/test.css">
    </head>
    <body>
        <h1>제목태그</h1>
        <h1>제목태그</h1>
        <h1>제목태그</h1>
    </body>
</html>
## test.scss
$fontSize: ("small": 12px, "medium": 18px, "large": 24px);

h1:nth-child(1){ font-size: map-get($fontSize,"small"); }
h1:nth-child(2){ font-size: map-get($fontSize,"medium"); }
h1:nth-child(3){ font-size: map-get($fontSize,"large"); }
## test.css
h1:nth-child(1) {
  font-size: 12px;
}
h1:nth-child(2) {
  font-size: 18px;
}
h1:nth-child(3) {
  font-size: 24px;
}
## 브라우저 결과

- 각각의 글자들이 잘 들어가는 것을 확인할 수 있습니다.
3. @each
- @each 는 Lists와 Maps 데이터를 반복할 때 사용합니다.
- 자바스크립트 배운 분들은 for in 문과 비슷하다고 생각하면 됩니다.
## 문법
//Lists
@each $변수 in 데이터 {
	//반복내용
}

//Maps
@each $키변수, $값변수 in 데이터 {
	//반복내용
}
- 데이터는 Lists나 Maps값을 직접 써도 되고, 값을 받은 변수명을 작성해도 됩니다.
- 그 데이터의 값을 새로운 $변수에 담습니다. 이때 Maps는 키변수와 값변수로 나누어 작성해줍니다.
1) Lists를 @each로 반복하여 사용
- 아까 위에서 색상을 작성할 때 scss에 아래와 같이 작성했습니다.
$color: red, green, blue;

h1:nth-child(1){ color: nth($color,1); }
h1:nth-child(2){ color: nth($color,2); }
h1:nth-child(3){ color: nth($color,3); }
- 위는 색상이 3개여서 그렇지 무지개색으로 7개 해야한다고 볼게요. 그럼 너무 귀찮은 작업이겠죠?
- 이것을 @each 를 통해 쉽게 해보도록 하겠습니다.
## test.html
<!DOCTYPE html>
<html lang="ko">
    <head>
        <meta charset="UTF-8">
        <title>SASS - 반복문</title>
        <link rel="stylesheet" href="css/test.css">
    </head>
    <body>
        <h1>제목태그</h1>
        <h1>제목태그</h1>
        <h1>제목태그</h1>
        <h1>제목태그</h1>
        <h1>제목태그</h1>
        <h1>제목태그</h1>
        <h1>제목태그</h1>
    </body>
</html>
## test.scss
$colors: red, orange, yellow, green, blue, navy, purple;

h1{
    @each $color in $colors {
        $i: index($colors, $color);
        &:nth-child(#{$i}){
            color: $color;
        }
    }
}
- index(리스트,값) : 이 함수는 해당 값이 리스트의 몇번째 있는지 인덱스번호를 반환합니다. Sass는 인덱스번호를 1번부터 주므로 nth-child의 번호와 같게 처리가 됩니다.
## test.css
h1:nth-child(1) {
  color: red;
}
h1:nth-child(2) {
  color: orange;
}
h1:nth-child(3) {
  color: yellow;
}
h1:nth-child(4) {
  color: green;
}
h1:nth-child(5) {
  color: blue;
}
h1:nth-child(6) {
  color: navy;
}
h1:nth-child(7) {
  color: purple;
}
- 알아서 각각 반복되어 nth-child가 처리되고, 값도 지정되는 것을 확인할 수 있습니다.
## 브라우저 결과

- 각각의 글자색으로 잘 들어 가는 것이 확인됩니다.
2) Maps를 @each로 반복하여 사용
- 위에서는 글자 크기를 다양하게 해봤습니다.
$fontSize: ("small": 12px, "medium": 18px, "large": 24px);

h1:nth-child(1){ font-size: map-get($fontSize,"small"); }
h1:nth-child(2){ font-size: map-get($fontSize,"medium"); }
h1:nth-child(3){ font-size: map-get($fontSize,"large"); }
- 역시 크기를 더 지정해서 반복해보겠습니다.
## test.html
<!DOCTYPE html>
<html lang="ko">
    <head>
        <meta charset="UTF-8">
        <title>SASS - 반복문</title>
        <link rel="stylesheet" href="css/test.css">
    </head>
    <body>
        <h1>제목태그</h1>
        <h1>제목태그</h1>
        <h1>제목태그</h1>
        <h1>제목태그</h1>
        <h1>제목태그</h1>
        <h1>제목태그</h1>
        <h1>제목태그</h1>
    </body>
</html>
## test.scss
$fontSize: (
    "xx-small": 8px,
    "x-small": 10px,
    "small": 12px,
    "medium" : 18px,
    "large": 24px,
    "x-large": 30px,
    "xx-large": 36px
);

h1{
    @each $key, $value in $fontSize {
        $fsList: map-values($fontSize);
        $i: index($fsList,$value);
        &:nth-child(#{$i}){
            font-size: $value;
        }
    }
}
- Maps는 인덱스번호를 반환하는 내장함수가 없습니다.
- 그래서 $fsList 라는 변수에는 값만 추출해서 Lists로 값만 배열해서 다시 담습니다.
- 그럼 Lists의 인덱스번호를 호출하는 index() 함수를 사용할 수 있습니다. 그 인덱스번호를 $i 에 담아 번호로 만들어 nth-child와 함께 사용합니다.
## test.css
h1:nth-child(1) {
  font-size: 8px;
}
h1:nth-child(2) {
  font-size: 10px;
}
h1:nth-child(3) {
  font-size: 12px;
}
h1:nth-child(4) {
  font-size: 18px;
}
h1:nth-child(5) {
  font-size: 24px;
}
h1:nth-child(6) {
  font-size: 30px;
}
h1:nth-child(7) {
  font-size: 36px;
}
- 그럼 각각의 nth-child로 만들고 번호도 잘 배당이되면서 글자 크기도 잘 지정이 됩니다.
## 브라우저 결과

- 브라우저에서도 각각 크기로 잘 들어가는 것을 확인할 수 있습니다.
4. @while
- @while 도 반복하는 구문입니다.
- 하지만 잘못된 조건으로 인해 컴파일시 무한 루프에 빠질 수 있어 권장하지는 않습니다.
## 문법
@while 조건{
	//반복 내용
}
## test.html
<!DOCTYPE html>
<html lang="ko">
    <head>
        <meta charset="UTF-8">
        <title>SASS - 반복문</title>
        <link rel="stylesheet" href="css/test.css">
    </head>
    <body>
        <h1>제목태그</h1>
        <h1>제목태그</h1>
        <h1>제목태그</h1>
    </body>
</html>
## test.scss
$i: 1;

h1{
    background-color: orange;
    @while $i <= 3{
        &:nth-child(#{$i}){
            width: 100px * $i;
        }
        $i: $i + 1;
    }
}
- 3번만 반복할 거라 조건을 $i <= 3 로 줬습니다.
- 그리고 $i는 1씩 증가해야 해서 $i: $i + 1; 로 기존 값에 1씩 더해줍니다.
## test.css
h1 {
  background-color: orange;
}
h1:nth-child(1) {
  width: 100px;
}
h1:nth-child(2) {
  width: 200px;
}
h1:nth-child(3) {
  width: 300px;
}
- 각각의 width 값이 100, 200, 300으로 잘 할당됩니다.
## 브라우저 결과
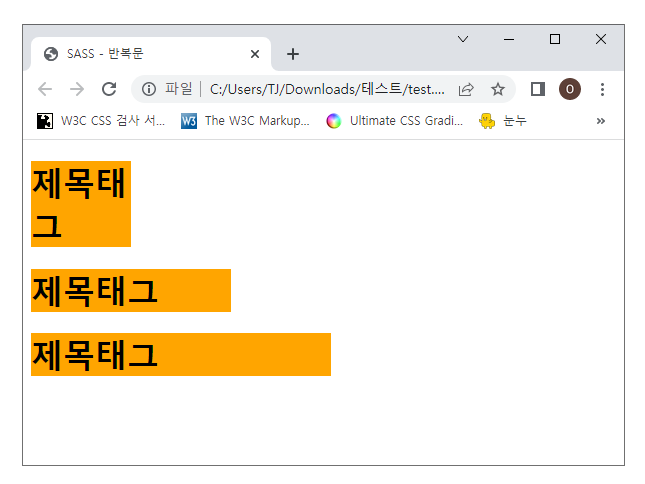
- 각각 잘 적용되는 것이 확인됩니다.
'웹언어 > SASS' 카테고리의 다른 글
| [SASS] 9강 SASS의 if와 @if - OSSAM강좌 (0) | 2020.08.23 |
|---|---|
| [SASS] 8강 SASS의 @function - OSSAM강좌 (0) | 2020.08.21 |
| [SASS] 7강 SASS의 @extend - OSSAM강좌 (0) | 2020.08.20 |
| [SASS] 6강 SASS의 @mixin과 @include - OSSAM강좌 (0) | 2020.08.04 |
| [SASS] 5강 SASS의 @import - OSSAM강좌 (0) | 2020.04.09 |


